


 En
En


In this tutorial, we will show you the simple way to switch between using Wayland or X11 on the Raspberry Pi.
Since introducing Raspberry Pi OS Bookworm, the official Pi operating system has made the giant leap from X11 to Wayland.
Wayland is one of the largest and most breaking changes the OS has seen because it works fundamentally differently from X11. Primarily, this change will break any software that is not built to handle Wayland. While not a problem for actively maintained software, many older pieces will refuse to work.
Wayland:https://wayland.freedesktop.org/
Luckily, Raspberry Pi OS makes changing between X11 and Wayland as simple as running a single script and hitting enter through a couple of options.
Wayland, however, isn’t without its benefits, and its introduction to Raspberry Pi OS has brought a few improvements. One of these improvements is the introduction of the super helpful Raspberry Pi Connect platform. This software allows you to easily remotely manage your Pi’s.
Raspberry Pi Connect:https://pimylifeup.com/raspberry-pi-connect/
With the latest versions of Raspberry Pi OS now using labwc, there isn’t even any performance difference between running Wayland and using X11. So, if you tried Wayland before the move to labwc, it is well worth trying it again, especially if you aren’t using
Equipment
Below is a list of equipment we used when writing this guide on switching between Wayland and X11 on our Raspberry Pi.
Recommended
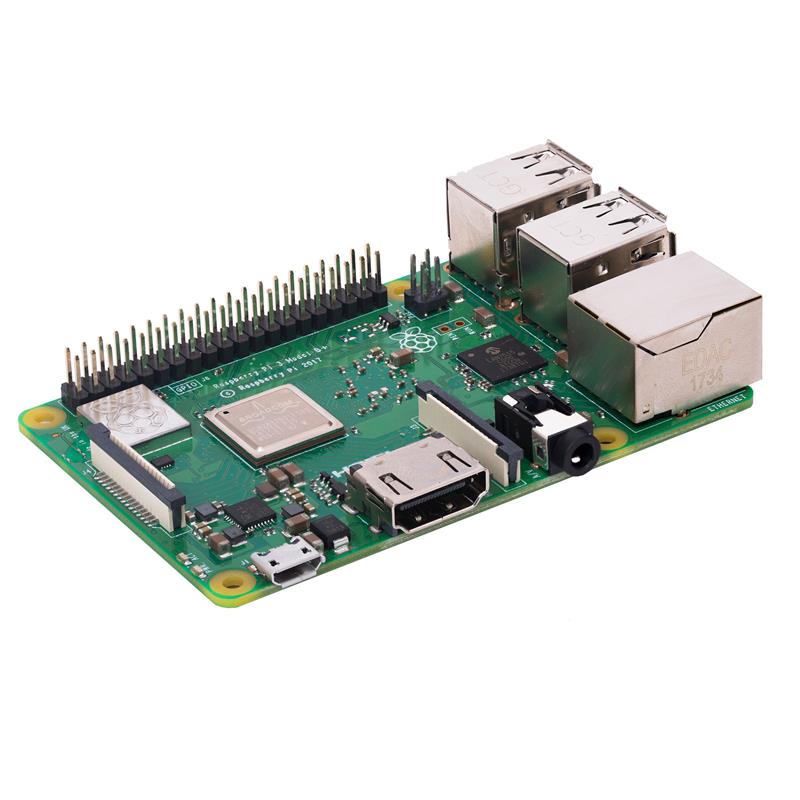
- Raspberry Pi
- Monitor
- Micro SD Card
- Power Supply
- Ethernet Cable or Wi-Fi
Optional
- Raspberry Pi Case
- USB Mouse
- USB Keyboard
- HDMI Cable
This tutorial was tested on a Raspberry Pi 5 running the latest version of Raspberry Pi OS Bookworm.
How to Switch Between Wayland and X11 on your Raspberry Pi
Over the following sections, we will walk you through the quick steps of switching between Wayland and X11 on your Raspberry Pi.
While these steps are for changing to X11, swapping to Wayland is done through the exact same menu, you just need to select the “” option instead.labwc
Launching the Raspberry Pi Configuration Tool
1. The first thing you want to do on your Raspberry Pi is open the terminal.
You can quickly bring up the terminal by pressing + + on your keyboard.
2. Before we use the raspi-config tool to switch between Wayland and X11 on our Raspberry Pi, we must ensure everything is up to date. Raspi-config itself often receives updates that help improve its functionality.
You can update the package list and upgrade any out-of-date packages by running the following two commands within the terminal.
raspi-config工具:https://pimylifeup.com/raspi-config-tool/
sudo apt update
sudo apt upgrade -y
3.After updating all the software on your Raspberry Pi, you can now launch the Rasp-config command line tool using the following command in the terminal.
sudo raspi-configUsing Raspi-config to Switch Between Wayland and X11 on the Raspberry Pi
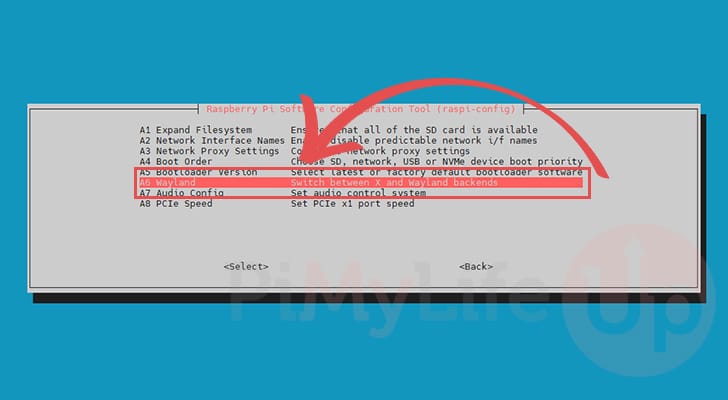
4. With the Raspi-config tool now open on your Raspberry Pi, the first thing you will want to do is navigate to the “” page.Advanced Options
You can navigate through this tool by using the keys. To select a highlighted option, press the key.

5. Within this menu, you will find an option labeled ““. Once you have the option selected, press the key.Wayland
This will take us to the menu that will allow us to switch between the X11 and Wayland backends on our Raspberry Pi.
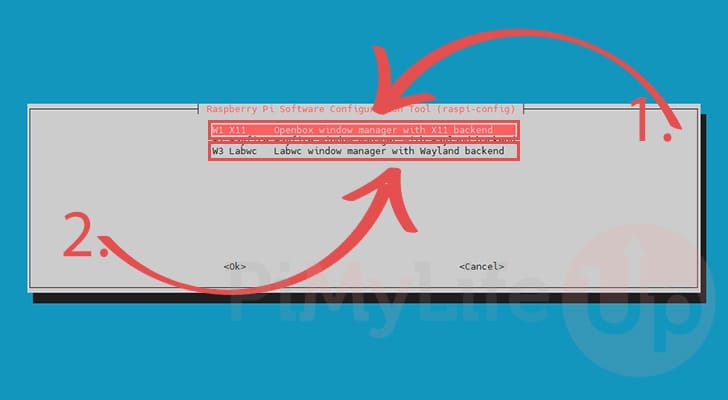
6. On this page you will see a few options. Two of these will enable Wayland, the other one will enable the X11 backend on your Raspberry Pi.
If you want to switch from Wayland to X11 on your Raspberry Pi, select the option named “” (1.), and press .X11
Alternatively, to swap from “” to Wayland, you will want to select the “” option (2.). Ignore the one labeled ““, as that is no longer supported by the Raspberry Pi OS dev team.X11Labwcwayfire
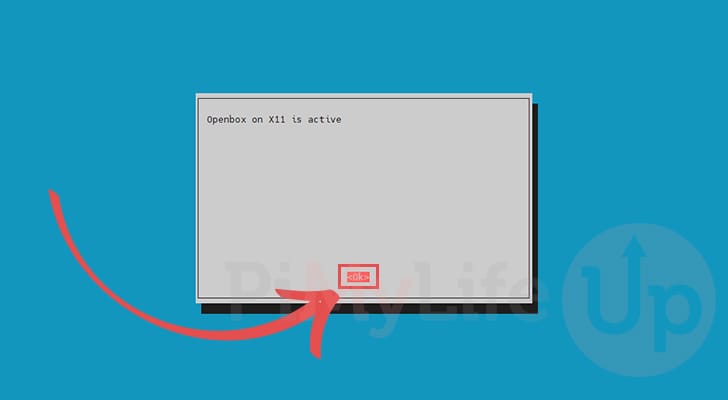
7. After switching to either X11 or Wayland on your Raspberry Pi, you will get a message indicating it is now ““. However, it won’t be active until you restart your Raspberry Pi.active
Press to continue back to the main menu of the Raspi-config tool.
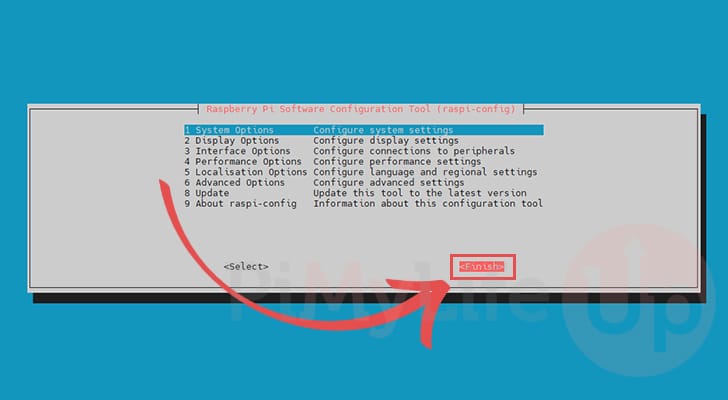
 8. Back on this main menu, select the “” option to exit the tool. You can also press the key to exit.
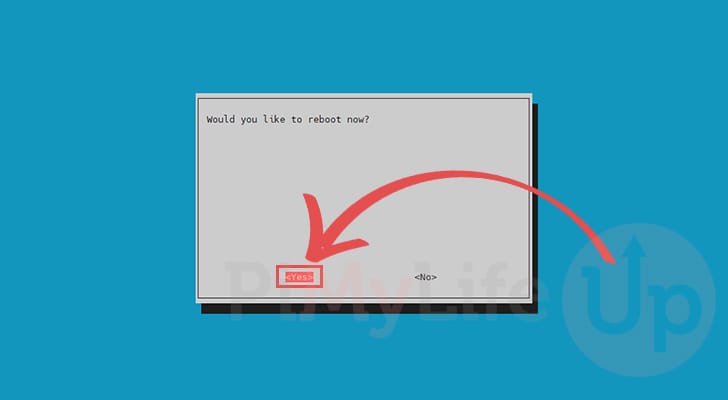
9. You will now be asked if you want to restart. For the switch from Wayland to X11 to complete on your Raspberry Pi, you will need to select the “” option and press .
Checking if your Raspberry Pi is Using X11 or Wayland
10. Once your Raspberry PI finishes rebooting, you will probably want to check whether you are now running Wayland or X11. Since most changes aren’t super obvious to the end user, you might not notice any differences at first
Open up the terminal and then print out the session type using the following command. With Raspberry Pi OS, the “” variable is populated with the session type when the desktop loads.XDG_SESSION_TYPE
Please note that this variable will not give you an accurate value if you are using SSH for this command. You will just see ““.tty
echo $XDG_SESSION_TYPE11. If Raspberry Pi OS is now using X11, you should see the following text output by this command.
x11Alternatively, if you switch back to Wayland on your Raspberry Pi, you will see the following output instead.
waylandTroubleshooting Changing to Wayland with Labwc on the Raspberry Pi
If you are making the switch from X11 to Wayland with Labwc there is a slight chance that you run into a black screen. This is caused by the “” tool changing you to use LabWC without the package actually being installed on your system.raspi-config
Luckily solving this issue is pretty simple, especially if you at least have SSH access to your Pi.
1. Your first step is to update the package list cache on your Raspberry Pi by running the following command.
sudo apt update2. Once the cache has been updated, you can install the labwc compositor on to your Rapberry Pi by running the following command.
This install process should only take a couple of minutes to complete.
sudo apt install labwc3. Finally, with the package installed, restart your Pi by using the command below within the terminal.
Once your device restarts, you should no longer have the blank screen issue.
sudo rebootConclusion
By this point in the guide, you will have learned how to switch between X11 and Wayland on your Raspberry Pi easily.
While Wayland continues to be improved and software support continues to grow, there are still some situations where you will have to rely on X11.
At least, for now, switching between these two is a straightforward process, but hopefully, as soon as Wayland is adopted more and more, there should no longer be any need to change to X11.
Original link: https://pimylifeup.com/raspberry-pi-wayland-x11/


